
In this post, I’m going to continue with how to build and open AOSP - Part 1 covered how to download the respository, and this part is how to build it so that you end up with an image that can be deployed via fastboot
Part 3 (coming up) will be all about opening the project up in IntelliJ so that IDE features such as ‘Go to Definition’ work correctly.
1. Add environment variables to .bash_profile
-
Open bash_profile by typing
nano ~/.bash_profile
- Add this line to it:
export ANDROID_JAVA_HOME=$(/usr/libexec/java_home -v 1.8)
Save (by clicking ^O and enter to confirm the file name) and Exit (^X)
Now either close and reopen your terminal, or load your new profile to the current terminal by running:
. ~/.bash_profile
2. Install curl with OpenSSL
This is needed for the jack-server to run - AOSP seems to need a version of curl specifically built against OpenSSL whereas curl built into macOS uses the Mac APIs for TLS support.
-
Install curl:
brew install curl –with-openssl
-
Open bash_profile by typing:
nano ~/.bash_profile
- Add this line to it:
export PATH=/usr/local/opt/curl/bin:$PATH
-
Export bash profile to the current terminal by running
. ~/.bash_profile
(or open and close the terminal)
- Your bash profile file should looks similar to:

3. Install older Xcode
This part is only needed if you’re building Android lower than Android O on macOS >= Sierra
Go to Apple Developer website (or anywhere else you could find older versions of Xcode)
Download any Xcode in the range of SDKs 10.8 10.9 10.10 10.11 (for example, Xcode 7.3.1
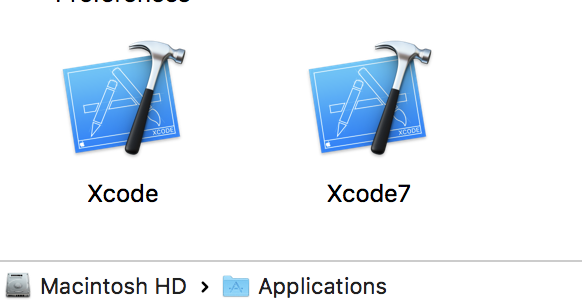
Install it side- by- side to your current Xcode: Copy it to Application and choose “keep both”, you can later rename the new version of Xcode to something easy such as “Xcode7”
Switch to the older Xcode for building AOSP by running
sudo xcode-select --switch /Applications/Xcode7.app
4. Make AOSP
-
Navigate to the Android AOSP root directory:
cd /Volumes/AOSP/android
-
Dot-source the script into your current shell to set up the environment
. build/envsetup.sh
-
Choose and set the build target, a list of all possible variables can be found at AOSP website, for example this target is emulator, with all debugging enabled
lunch aosp_arm-eng
-
Run the build (caffeinate is for the process to stay awake)
caffeinate make -j4
- Wait ~40 minutes or so :)
Notes about my process
JX where X is the number of processes running concurrently, you can increase / decrease this number but a good number is 2x the number of CPUs in your computer (-j4 for an i5-based machine and -j8 for an i7-based machine).
Ninja is an incremental build, if it’s interrupted, it’ll just pick on where it left off so don’t worry about cancelling mid-way